

Monitoring Ruby on Rails with Honeybadger


If you are looking for a thorough, step-by-step guide on setting up the Ruby on Rails logger with Honeybadger, you are in the right place.
It is not a surprise at all, because Ruby on Rails Honeybadger integration is a very popular choice - and for good reasons, too!
Let's learn all about integrating Honeybadger with Ruby on Rails logger...
What is Honeybadger?
Honeybadger is a Software as a Service product dedicated to monitoring applications, Ruby on Rails being one of them.
It was initially created with the sole purpose to monitor Ruby on Rails applications, by a team of Ruby on Rails developers frustrated with their current solution.
On their website, one of the first things you can read is
Do you have to keep production online, even when you'd rather be coding?
honeybadger.io
And I don't know about you - well, I kinda imagine meeting you here my Dear Visitor - but I relate to that question so, so much.
I mean, who likes fixing bugs when writing new shiny features is an alternative, right?
Yet still, a responsible developer does fix the bugs in order to decrease the technical debt, which never ends.
Honeybadger is a tool that makes the process as painless as it can possibly be.
It provides a nice real-time dashboard accessible at any point from a web browser and its free tier is the most generous of all available.
What is the most important though using it, you get an overall feeling that those who created it knew exactly what you are going to need in order to fix errors.
Advantages of using Ruby on Rails with Honeybadger
- It is free to use up to 7500 API requests per month
- Intuitive UI, as opposed to the default Rails logs
- Easily extendible logs with additional context
- Integrates with Javascript too, if you need it
- Offers uptime and check-in monitoring The logger that's available in the Ruby on Rails by default is a primitive way to monitor the application on production.
Honeybadger fully takes advantage of its behavior and presents neatly aggregated logs just like we need them - grouped, with an ability to filter, sort and search through them.
Unless you like to tail log/production.log all day and then master your
grep on those, without the tool like Honeybadger rolling your Ruby on Rails
application to the production leaves you blindfolded.
Having it in place from day one goes a long way.
Required Honeybadger setup
Now that we have fully deservedly praised Honeybadger for monitoring Ruby on Rails applications, let's see what's required on their end in order before we hook those two up together.
Follow the steps below:
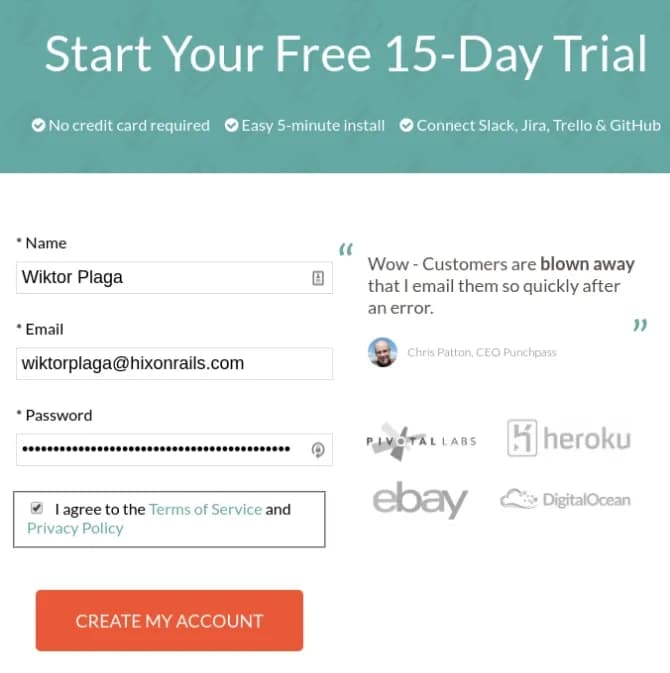
- Start Free Trial on the Honeybadger's official website Start Free Honeybadger Trial
- Provide your basic account information Sign up for a first time
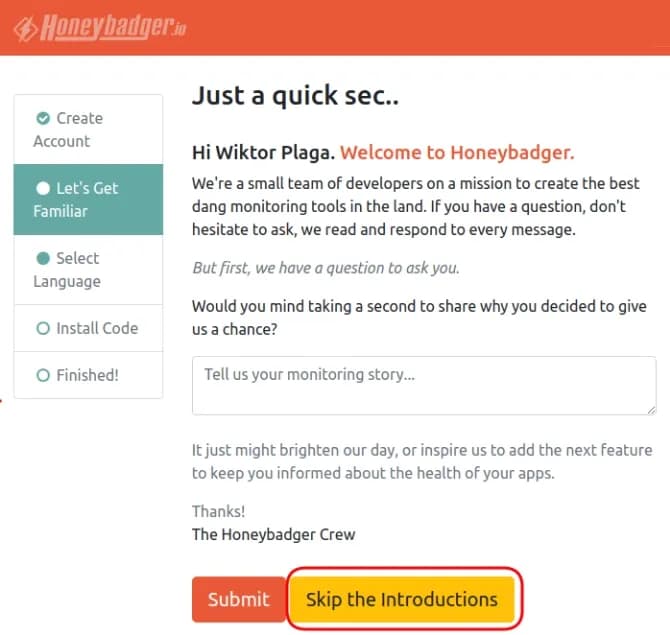
- Skip the Introductions, unless you feel like prose Introduce yourself or skip the third step
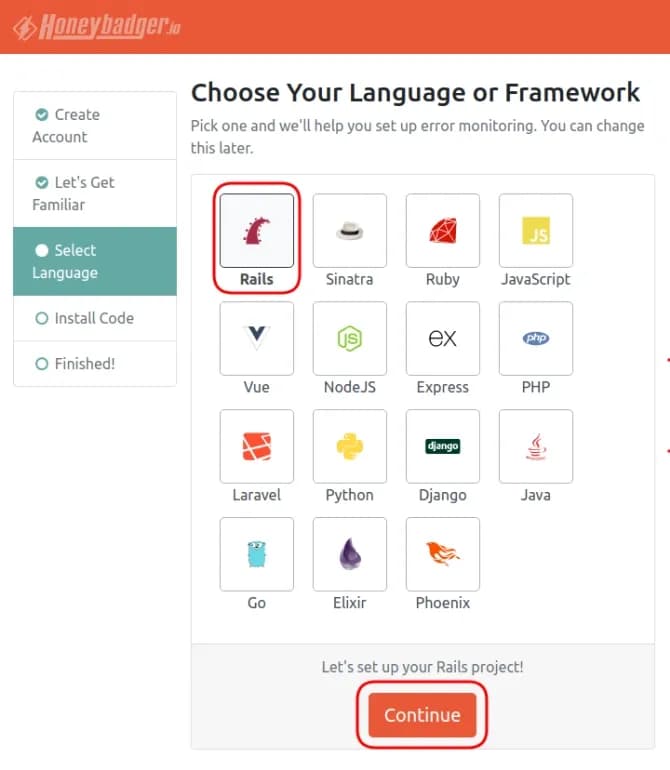
- Select the Ruby on Rails framework Select Rails framework
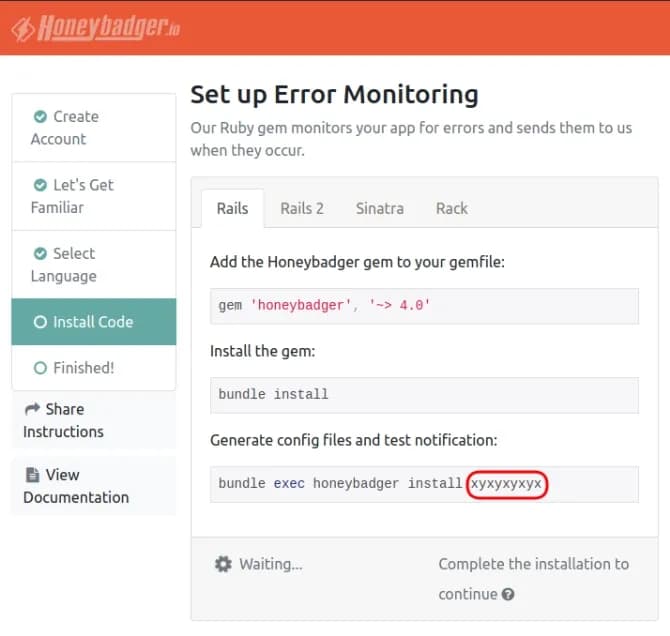
- Copy your new Honeybadger's API key Copy your API key

With all that in place, let's get to the surprisingly easy Ruby on Rails configuration part.
Honeybadger initialization in the Ruby on Rails project
Honeybadger does not disappoint in terms of configuring it in the Ruby on Rails project. It all breaks down to three simple steps anybody can follow.
First of all, add the honeybadger gem to project's Gemfile
Gemfile
gem 'honeybadger'
After doing so, run the following two commands from the command line
$ bundle install
$ bundle exec honeybadger install YOU_API_KEY
Those two install the honeybadger's gem and create the config/honeybadger.yml file with your API key in it.
An alternative that aligns nicely with 12-factor's "Store config in the
environment", if you use dotenv-rails for
example, is using the dedicated HONEYBADGER_API_KEY environment variable.
.env
HONEYBADGER_API_KEY=YOUR_API_KEY
Having these we are ready to send any uncaught exception to the Honeybadger's API and browse it its awesome UI instantly.
Ruby on Rails Honeybadger configuration
So far we have met one Honeybadger's configuration "option" available for the Ruby on Rails integration.
Let's review all of them.
Environments
With Honeybadger's config being stored in the YAML file, we are able to nicely customize it for any Ruby on Rails environment to the full extent.
One option that's super important that we are sure does not happen is not to report errors that occur in the test environment.
This could not be easier
config/honeybadger.yml
api_key: YOUR_API_KEY
report_data: true
test:
  report_data: false
You can customize any configuration option for every environment in the
top-level YAML key, same as the test is done in the example above.
Sensitive data omission
There is one thing worth considering especially when running a Ruby on Rails application that deals with the data coming from users.
It is omitting all the data that's not necessary for debugging and can otherwise do harm when leaked.
Honeybadger, of course, thought of that and allows some drop-in configuration as well as a fully customizable one.
Let's take a look
config/honeybadger.yml
request:
  filter_keys:
  - password
  - password_confirmation
  - cc_number
  - !ruby/regexp '/bank(-|_)account(-|_)number/i'
  disable_session: true
  disable_params: true
  disable_environment: true
  disable_url: true
First of the options residing under the request key allows us to stop
sending anything to the Honeybadger API.
It accepts full params names and regexp in the form of the YAML array.
Other options are pretty much self-descriptive except maybe the third one.
The disable_environment key stops the Honeybadger gem from reporting
anything from the Rack environment.
Exceptions filtering
Along with modifying any request-related data, we can explicitly instruct the Honeybadger in our Ruby on Rails application not to report specific errors and exceptions.
Here's how you do it
config/honeybadger.yml
exceptions:
  ignore:
  - 'WhateverError'
  - !ruby/regexp '/NotSoImportant$/'
  - !ruby/class 'WhoCaresError'
  ignore_only:
  - 'MyError'
  ignored_user_agents:
  - 'Mozilla/5.0 (compatible; Googlebot/2.1; +http://www.google.com/bot.html)'
  - !ruby/regexp '/Googlebot/i'
The first key of the top-level exceptions configuration allows us to ignore
specific uncaught exception classes in the same manner as the sensitive data
filtering works.
It accepts regexp and the full Ruby class name.
The last key especially helps to filter-out those errors generated by various bots and crawlers, such as for example a Google bot.
You can find a full list of those User Agents here a full list of those User Agents here</a> if you don't really care about those errors.
User Experience Tweaks and Perks
Two truly unique features that Honeybadger equips the Ruby on Rails application with are User Informer and Feedback.
Let's see
config/honeybadger.yml
user_informer:
  enabled: true
  info: "Error ID: {{ error_id }}"
feedback:
  enabled: true
The first of those options that you won't find in any other error and exception monitoring service is called User Informer.
It gives you control over what user's see whenever the error occurs while using your Ruby on Rails application.
The error_id variable is a UUID that identifies the thrown exception - this
way any user contacting your support team can provide the unique error
identifier, so they can easily identify the problem faster.
On top of that, the feedback key gives you an ability to ask users for the
detailed steps they took that lead to the exception.
It comes as a simple form that you can internationalize
config/locales/en.yml
en:
  honeybadger:
    feedback:
      heading: "Care to help us fix this?"
      explanation: "Please describe your steps that lead to the error to the best of your knownledge"
      submit: "Send"
      thanks: "We are on it!"
      labels:
        name: "Your name"
        email: "Your email address"
        comment: "Comment (required)"
With those two in place fixing the errors is a breeze.
Conclusion
After reading it I'm sure you'll agree with me that Honeybadger is both powerful and simple to use.
On top of that, it is the most generous of all the error and exception monitoring tools available for Ruby on Rails when speaking of its free plan.
Its configuration is as straightforward as it gets, yet it still offers something unique in the domain of Ruby on Rails monitoring - an ability for users to help us seek and destroy errors faster.
What do you think of Honeybadger for Ruby on Rails?
Have you had a chance to use it extensively and have some thoughts on the matter?
Please let me know in the comments!


